To learn more HTML/CSS, check out these tutorials!
is an open source library for machine learning based on an original library created by google (core in C++ with bindings in Python. Tensorflow.js is a javascript ibrary capable of learning in the browser with training sets and test sets. Tensors are numbers eg: numbers, vectors, matrix. These tensors are used not by the CPU but the GPU (Graphical Processing Unit). GPU make us of the WEBGL library based in OPENGL Technology. Images are sets of numbers in matrixxs, every single pixel is an RGB alpha(transparencyopacity) numbers. With the training sets we have thousands of sample images that are used for training our neural network. Every hidden layer on the neural network is a different feature, eg; Contour, corners, groups of pixels. After training the tensors are been optimised with a function producing the minimum distance between all the images like in a lineal regression. As a students you need to explain an example using neurl network, eg; MNIST example uses sixty thusand training images of 28x28 pixels of numbers and ten thousand examples of text images
MNIST data base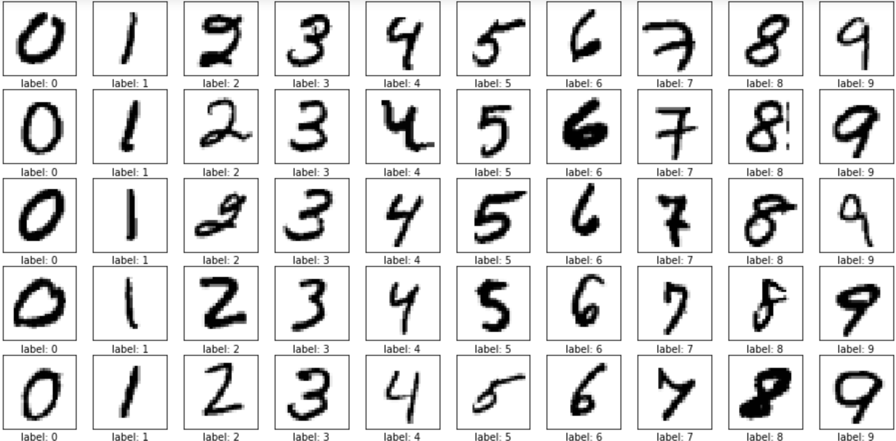
What are MobileNets?
MobileNets are a class of convolutional neural network designed by researches at Google. They are coined “mobile-first” in that they’re architected from the ground up to be resource-friendly and run quickly, right on your phone.
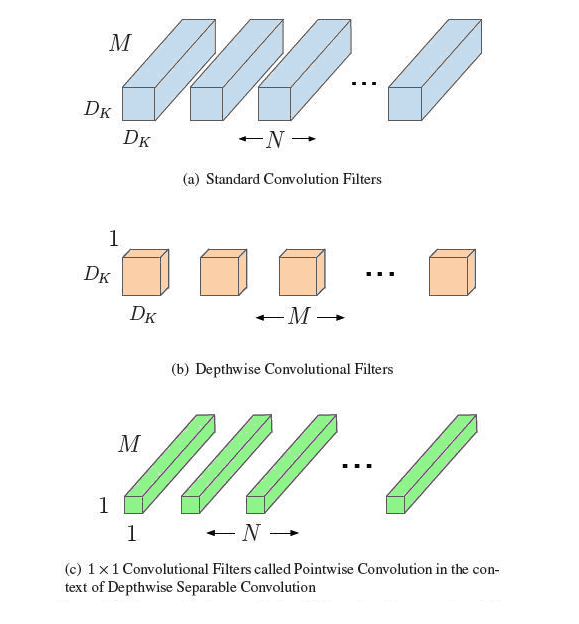
The main difference between the MobileNet architecture and a “traditional” CNN’s is instead of a single 3x3 convolution layer followed by batch norm and ReLU, MobileNets split the convolution into a 3x3 depthwise conv and a 1x1 pointwise conv. The details of why this is so significant can be found in the MobileNet paper, which I strongly encourage you to read.
So what’s the catch? Accuracy. MobileNets are not usually as accurate as the bigger, more resource-intensive networks we’ve come to know and love. But finding that resource/accuracy trade-off is where MobileNets really shine.
MobileNets surface two parameters that we can tune to fit the resource/accuracy trade-off of our exact problem: width multiplier and resolution multiplier. The width multiplier allows us to thin the network, while the resolution multiplier changes the input dimensions of the image, reducing the internal representation at every layer.
Google open-sourced the MobileNet architecture and released 16 ImageNet checkpoints, each corresponding to a different parameter configuration. This gives us an excellent starting point for training our own classifiers that are insanely small and insanely fast.
How to build your own dataset to train a MobileNet
Our challenge today is to build an image classifier that can detect if an image is a road or not a road. It’s like hot dog, not hot dog, but for roads.
Why road, not road? At Coastline, we’re developing safety features for your car with mobile apps that use computer vision. As with all vision problems, user privacy is critical. So one of the first checks we do when a user turns on the camera in our app is check if it sees a road. If it doesn’t, we turn off the camera. We want to be able to do this fast and at as little computational cost to the user as possible.
Since we’re tackling a custom problem, we need to start with creating our dataset. Our target is to collect 10,000 images, split roughly evenly 50/50 road/not road.
We’ll get data from a few different places:
- 4,000 obviously road images sampled randomly from the Coastline driving dataset
- 2,000 obviously not road images sampled randomly from the ImageNet dataset
- 3,000 less obviously not road scenics sampled from the internet to make sure the classifier doesn’t just learn sky, not sky
- 1,000 less obviously road scenics also sampled from the internet to make sure the classifier doesn’t recognize windshield reflections or other commonalities in the Coastline data
We’ll place each image into one of two folders, each representing the class of that image: road and not-road. That’s all we have to do to prepare our images for retraining!
However, while grabbing CC images from the internet is a great place to add diversity to your dataset, it comes with a drawback: the labels are noisy. For instance, an image found by searching “road landscape” could have a road front and center with a nice scene in the background, or it could be a mountain scene with a tiny road off in the distance.
We could solve for this by going through each image and hand-labeling it, but why do that when we have deep learning?! Instead, we retrain a big network (like Inception V3) on all our data, paying special attention not to over-fit on our training data by early stopping and heavy data augmentation. Then we run every image of our dataset (even those images we just used to train!) through the network and keep track of the images it classified incorrectly or with little confidence. Then we go through each of those images and move them to their proper classes, if applicable. This reduces the number of images we have to manually clean up significantly. And doing multiple passes of this technique helped us increase our accuracy by seven percentage points on Inception.
Now that we have 5,000 road images and 5,000 not road images, in a structure like this…

…we’ll use TensorFlow and transfer learning to fine-tune MobileNets on our custom dataset.
How to retrain a MobileNet that’s pretrained on ImageNet
TensorFlow comes packaged with great tools that you can use to retrain MobileNets without having to actually write any code. Now you can use the scripts in the example folder to retrain MobileNet on your own data.
But wait! Which MobileNet should you use? That’s a good question. Let’s retrain a small assortment and see how they perform. To kick off training, we’ll run the following command from the root of the TensorFlow repo:

The architecture flag is where we tell the retraining script which version of MobileNet we want to use. The 1.0 corresponds to the width multiplier, and can be 1.0, 0.75, 0.50 or 0.25. The 224 corresponds to image resolution, and can be 224, 192, 160 or 128. For example, to train the smallest version, you’d use --architecture mobilenet_0.25_128.
Some other important parameters:
- learning_rate: This is something you’ll want to play with. I found 0.0001 to work well.
- testing and validation percentage: The script will split your data into train/val/test for you. It will use train to train, val to give performance updates every “eval_step_interval”, and test will run after “how_many_training_steps” to give you your final score.
- validation_batch_size: Setting this to -1 tells the script to use all your data to validate on. When you don’t have a lot of data (like only 10,000 images), it’s a good idea to use -1 here to reduce variance between evaluation steps.
After retraining on several model architectures, let’s see how they compare.
Comparing MobileNet parameters and their performance against Inception After just 600 steps on training Inception to get a baseline (by setting the architecture flag to inception_v3), we hit 95.9%. Training took 18 minutes. (There is a lot of room for improvement here, but we don’t have all day!) The resulting checkpoint landed at 84mb. And doing a quick speed test by running 1,000 images through it shows it can classify images on an NVIDIA GeForce 960m GPU at ~19fps.
Aside: Why “only” 95.9% and not 100%? It seems like a pretty simple problem, right? Well, besides the ample tuning we could do to the training parameters (we actually achieved 98.9% with the same data using a different configuration in another go), it turns out the distinction between classes is a bit more subtle than it seems on the surface. Take these cases:
- The image is a one-lane dirt road in the woods: Is it a road or a trail? I don’t even know.
- It’s a landscape scenic with a road in the distance. Is it a picture or a road, or is there just a road in the picture? At what point does the scenic move classes?
- It’s an artsy tilt-shift photo of a couple holding hands in the foreground and a time-lapsed street in the background. Road or not road? Flip a coin.
So, how do the MobileNets perform? Not surprisingly, not quite as well. However, the tradeoff benefit is astounding.
Using the biggest MobileNet (1.0, 224), we were able to achieve 95.5% accuracy with just 4 minutes of training. The resulting model size was just 17mb, and it can run on the same GPU at ~135fps.
For those keeping score, that’s 7 times faster and a quarter the size. All for just 0.4% loss in accuracy.
How about the smallest MobileNet (0.24, 128), using quantized weights? Big accuracy tradeoff, achieving just 89.2%. But get this: 450 frames per second, and the model takes just 930kb of memory. That’s kilobytes!
Using your retrained MobileNet to classify images
Now that you have your MobileNet retrained on your custom dataset, it’s time to give it a try. Not surprisingly, TensorFlow comes with a script to do that, too.
Aside: It should be noted that in our fairly simple two-class problem, the accuracy trade-off is not that big. In the case of ImageNet with its 1,001 classes, the accuracy tradeoffs are much more significant. See the table here.
Filters
Example that I try